I repainted a bulletin board that used to be bright red. I LOVE how it turned out. It will be pretty in the classroom too! Don't you think?
This is what it used to look....cork board under the blue plastic I taped over it....red painted edges.
It actually used to be gray in my hub's office. But I took it home and painted it red. But I didn't end up using it in the grandkiddie room. I made a giant chalk board instead. They love it so much!
And I covered it with fabric and ribbons and glittery butterfly pins....
A quick and easy video on how to spray paint old furniture....
Taping up the bulletin board with paper, trash bags, to cover up the cork portion.
It use to be a fire engine red for a kiddie room....now I want it for my craft room since all my kiddos are grown and gone.
Here is my painted bulletin board after I sprayed 2 coats of the Rustoleum spraypaint on it....You can see how I taped the edges with a trash bag and masking tape....
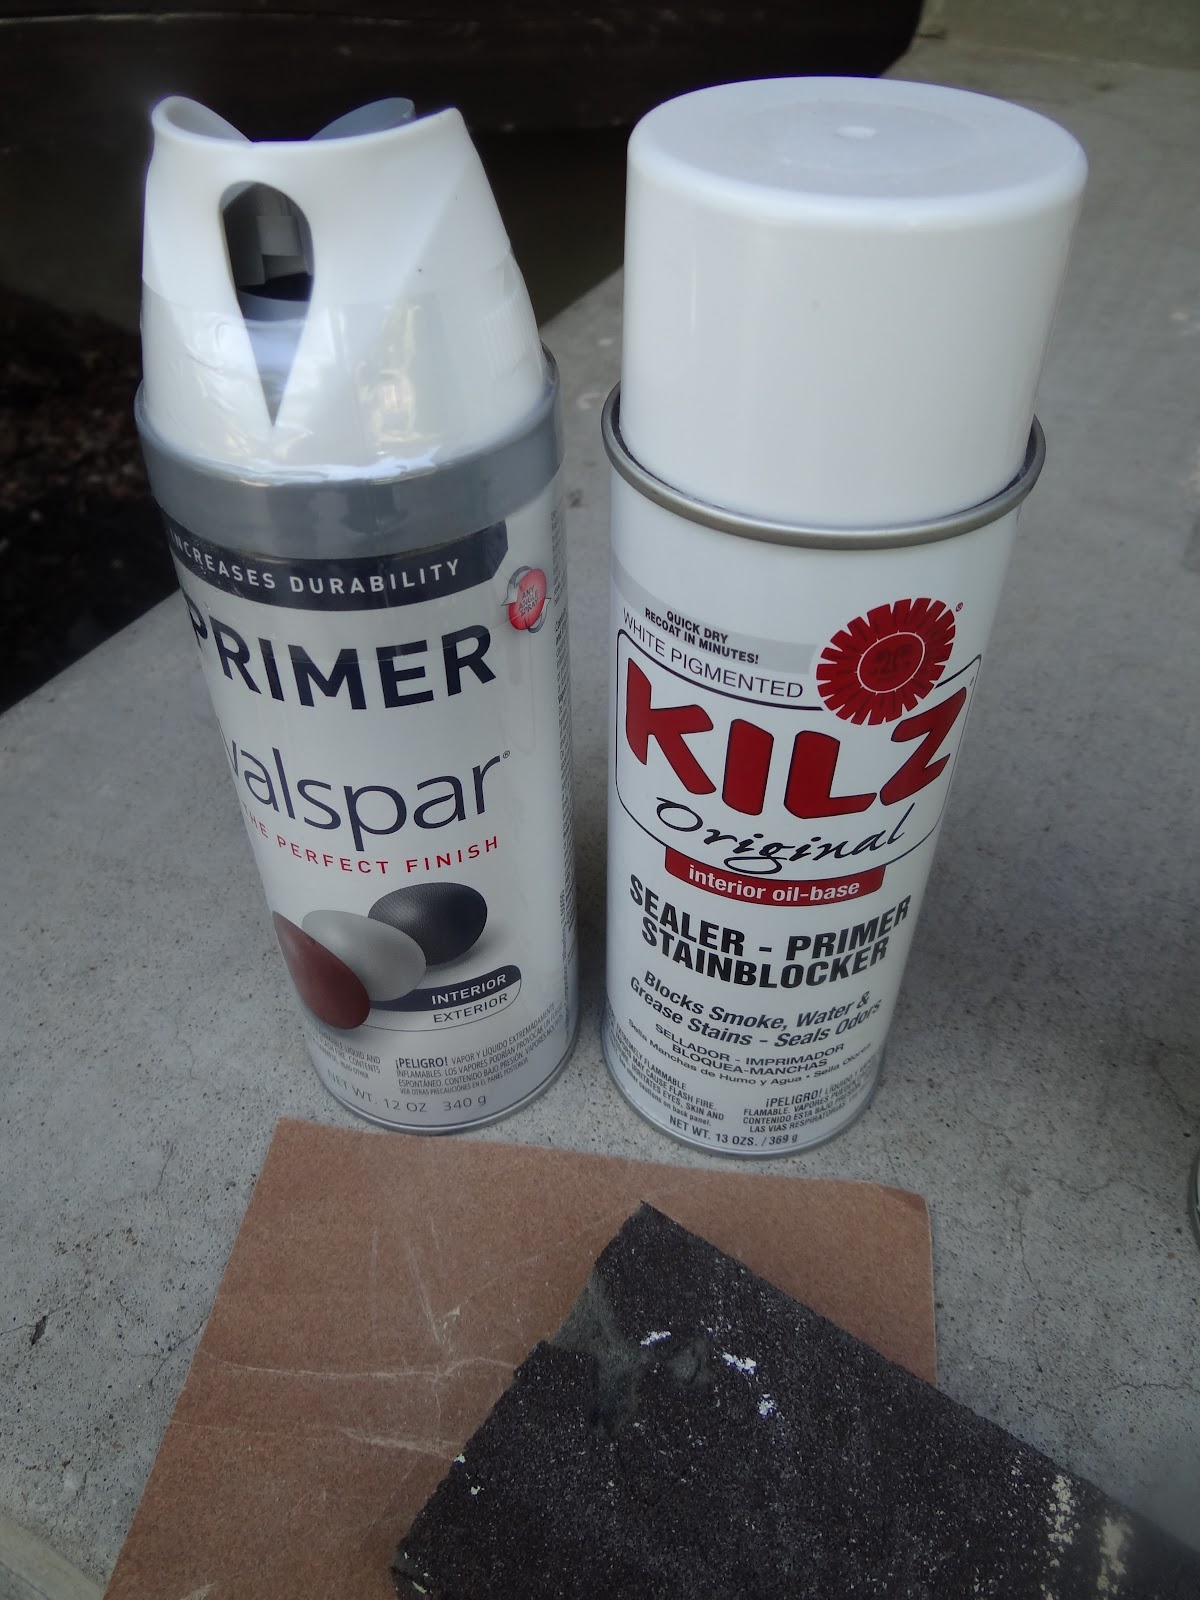
KILZ primer and Valspar are the best...they go on smooth .
Valspar and Rustoleum are good spray paints too....I liked this light blue color. It will match my little book boxes in my classroom library. I bought blue, light green, and pink last year and redid the library. CUTE!
I covered the bulletin board with a kitchen trash bag and masking tape....not too bad for prep!
Here were my 2 fabrics and my ribbon I wanted to use.
I sewed the glittery, striped fabric onto 2 sides of the butterfly fabric....and cut it to fit the bulletin board....
Then I just glue gunned it all around the edges of the cork after letting the paint dry overnight. Lookin good! It's too bad the back would not come off, it would have been easier to just wrap the fabric around, but, it was glued down in every corner and edge.
Then when it was finished I added some embellishments....a couple of glittery butterflies and push pins.
I bought some glittery, giant push pins at Hobby Lobby for my painted bulletin board redo. I put one in the center of each cute little flower.
Finished bulletin board redo....it turned out just like I wanted.
Well, don't look too close at my bad sewing job though. It's kind of hard to believe I've had 5 years of sewing in high school and college level, right? Yeah, I've gone downhill there. :D
I think it will look great in my classroom this year! A LOT better looking than the plain red one. I love spray paint!
Pretty painted chest will look great in my craft room makeover!
I'm trying to finish my craft room this summer. But I'm such a perfectionist that it is taking WAY too long. I think I need to just simplify and lower my expectations. I want the cute little die cut vinyl on all my little buckets and totes. It may never happen! But I did want to repaint an old, brown dresser in a pretty bright beachy blue. So I finally got around to it this week. Yay me!
For Brush Painting, I found this excellent youtube to help anybody who has never painted furniture before. This gal has all the right moves.
But if you'd rather be lazy and go the CAN of spray paint route, this youtube also gives excellent advice.
Laying out the drawers for sanding and removing the hardware before I start the furniture primer coat......
My supplies to start the sanding and primer coat...
Oops, first I covered the hardware with masking tape.....I'm lazy remember? Then the hubs came home and took them off for me with his cordless drill....those men and their power tools....gotta love 'em....
Old dusty chest of drawers in ugly bugly brown to go with the pastels in the craft room....need to do a little change up! So I'm spray painting the wood.
Bulletin board I wanted to change from PLAYROOM bright red, to CRAFTROOM sky blue....
6 GREAT TIPS FOR REPAINTING FURNITURE I spray painted my dining room table (ball and claw) and all the oak chairs last summer from light oak, wood color to black (when I'm off of school I paint my brains out!) HERE's a link. so I learned dos and don'ts from doing all those painting projects. Here are my tips:
1.SAND A LITTLE, NOT A LOT! I usually sand my stuff a little bit before even priming it. Not so much that the former paint is gone, but enough that it feels smooth to my fingers. I like a smooth finish and I get it by sanding first. Start with 60 grit if you have a real awful piece. Then move to 120 grit, or just use 120 grit if your piece is pretty decent. You can end with 150. You need to rub off some of the gloss finish on a previously painted item, to help your new paint adhere better.
You could start with 120 if you really need to remove stuff...I used 150 grit sandpaper and called it done after a light sanding....
Hand sanding...just a bit to roughen up the surface....I would sand more if it needed it....you be the judge!
2.USE A GOOD PRIMER COAT!I always prime stuff I want to turn out beautiful. Use KILZ brand primer if you are doing something light colored. KILZ only comes in white finish. But if you are painting something red, black or brown, I would instead use a good KRYLON primer near that color. Both are around $4.00.
Spray painting wood furniture...you need this KILZ primer. It's great! The Valspar doesn't cover as fast .
3. I USE SATIN FOR SPRAYPAINT and REGULAR PAINT. Some people like gloss, but I think the furniture ends up looking more expensive when it is kind of a satiny finish instead of high gloss. If you have young kids you may want to go the GLOSS route for easier cleaning up afterwards, (you know those messes they like to make! :D) OR do a topcoat afterwards in polyurethane (for dark paint) or Polyacrylic (for light paints) to protect your item.
This is really good good spray paint for wood furniture, Krylon is good too.
4. BUY KRYLON SPRAYPAINT at Walmart for around $3.00. It's the best. Just ask anybody.Rustoleum is good too but some colors aren't my favs. I did like this blue color and I got it on a good sale!! And for regular paint I love GLIDDENfrom HOME DEPOT the best. It isn't the most expensive, but it covers really well. The BEHR is just too thick for my taste.
5. IF YOU NEED TO PUT A SEALER ON, USE POLYACRYLIC NOT POLYURETHANE (it will yellow after time!) I have rarely ever finished anything, but I rarely paint things white either. If you want it to last and it gets used a lot, use polyacrylic to add a topcoating to protect your stuff. The only thing I'd use Polyurethane on is stained woods.
6. DON'T PAINT WHEN IT IS TOO COLD OR TOO HOT. I like to wait for a day that is between 65 and 80 degrees outside. I painted last summer on my deck in 90 degree heat and it seemed to melt some of the paint before it dried, and some bubbled a little. Also don't paint on a rainy day unless you can do it in your garage. A moderate day is best. And out of direct sunlight is even better. I usually paint on the grass in the shade, or under my deck shade with an old sheet under the item I'm painting. That way I'm not breathing in any fumes!
Finished outside of the chest of drawers....looks pretty good!
I went over each drawer twice after priming...It all took only 2 cans of Rustoleum spray paint and almost 2 cans of primer!
The best part is.....my hubs mows the lawn the next day and all that paint disappears! (I love when that happens...somebody coming along to clean up my mess!) He also picks up my weeds when I weed the garden. Isn't that cool? (i know...I should clean up my own weeds..... my bad.)
Setting out in the front yard, spray painted furniture drying in the shade......almost done!
Finished Craft Room spray painted dresser! I used almost 2 cans of paint. And it was super EASY! I think I'll put some vinyl lettering on each drawer....once I figure out what junk to put inside!
Now I just have to finish all the shelves. My daughter did these cute vinyl letters on my little pastel buckets. Thanks Tiffany! She's the best daughter in the world. And she gives me good decorating advice too.
That was the easiest furniture makeover I've ever done! 3 CHEERS for spray paint!
The hubs and I went to see the Pioneer Day floats for the Days of 47 Parade.
Irish band drummers warming up for their performance at the Expo Center in Sandy, Utah.
I love quilts so I picked out this cute float to flash a pic with!
Cute glittery floats at the Days of 47 Parade.
Loved the steam coming out of this Pioneer Day float.
This giant pioneer lady was funny looking....had to get the hubs to pose with her......heheh.....
What a geek I am! I LOVE these things!
Had to pose with the giant pioneer dude too!
These cherries on the banana split were giant red bouncy balls......so shiny and pretty!
BYU had their blue float......and across the way was the U of U red float too!
My church did this float.....so cute with the sparkly wheels that turned....
These are the Disney Princesses!! No, just kidding, they are the Pioneer Day Princesses or Days of 47 Princesses.....something like that!
Clown making balloon animals for the kids....
Panning for gold, lots of fun for the kiddos....
Lookie here! A balloon animal poodle pup!
This was a strange float....people were getting their picture taken next to the giant Jesus.....kinda strange!
Mormon temple float....
Irish bagpipe band....pretty neat to hear them march around playing tunes....
My favorite was the pirate float....very cool looking!
Gotta love a LEGO float!
Parts of the floats lifted up and moved around
Old pioneer outfits on stands.....pioneer letters and memorabilia were everywhere....I loved that part.
I am in awe of the Pioneers and the struggles they endured. I don't think I have what it takes to have done it. I'm glad we, in Utah, honor them once a year. Happy Pioneer Day!